")
A fireplace is often the central feature of a room. Whether it’s a traditional open fire, a log burner or a gas or electric fire, there’s something about a fire that we seem to be drawn to, and when it’s in our homes we want to make a feature of it.
Fire surrounds and mantelpieces come in all shapes and sizes, from ornate cast iron pieces, to stone structures, to rustic-looking floating wooden mantel shelves. Before we go any further, let’s just clear up the terminology:
- A fireplace means the entire structure that houses the fire, including the chimney breast, the hearth and the opening where the fire is.
- A fire surround is the decorative framework around the opening – it usually protrudes from the chimney breast, and includes the mantel.
- The mantel (or mantelpiece) is the horizontal shelf-like part above the fireplace opening. It is often part of the fire surround, but can also be a standalone shelf.
Because the fire and its surround are often so central to the room, and such a feature of it, giving your fire surround a makeover can be a quick and affordable way to make the whole room feel different.
Painting a fire surround is not a difficult job to take on. I’ve done a fair few in my years as a professional decorator, and in this blog I’ll take you through the tools and materials you’ll need, the preparation you need to do, the painting process, and some hints, tips and things to consider when taking on a project of this nature.

Tools and Materials Needed for Painting a Fire Surround
- Screwdriver
- Dustsheets
- Masking tape
- Degreaser/detergent
- Methylated spirit
- Old cloth/rag
- Sandpaper of various grades
- Dusting brush
- Decorators caulk
- Wood filler
- Primer
- Your paint of choice
- Paint brushes/rollers
I’ll go into more details on many of these, and include some recommendations, as we go through the prep and painting process.
Step-by-Step Guide
Asses the fire surround
Can it be easily removed from the wall? If so, can it be easily taken apart into its component form? Or is the structure not too sound? In which case, can you make repairs to it before you start painting? If it’s not sound, it may be best to either keep it in one piece, or leave it fixed to the wall, to avoid the risk of further damage.

Prepare your working area
If the fire surround can be easily detached from the wall, clear a large space in the middle of the room (or in another room or garage, whatever works) and put down dustsheets.
If the surround cannot be safely and easily detached, clear as much space around it as possible to create a workspace for yourself, and put dust sheets down on the floor. Ensure that the hearth and any fire structure (e.g. log burner, gas fire etc) are properly covered.
Use suitable masking tape to protect the adjacent wall and hearth or floor. For safety reasons, it’s probably best to turn off an electric fire at the fuse, and to turn off the gas supply to the fire (there is often an isolating tap nearby) if possible.

Clean the fire surround
The woodwork must be thoroughly cleaned, to help your paint to adhere to it properly. There will almost certainly be dust, grime and possibly soot on it, but there may be furniture polish and who knows what else as well, so thorough cleaning to remove all these contaminants is vital.
I find cleaning with an old cloth and methylated spirits is a very effective way of removing grease, wax, furniture polish etc, after which I wipe down again with a cloth and a mild detergent solution, and then allow it to dry thoroughly.
Sanding
Sand the entire fire surround to provide a “key” for the primer to adhere to. The objective is not to remove any previous coatings completely; whether it’s painted or varnished, your aim is to sand off any loose, flaky material, and just dull down the surface of the rest of it to make it less shiny, and easier for the primer to adhere to.
The grade (“grit”) of sandpaper to use will depend to some extent on the state of the wood you are working on, but I would typically start with medium grade (120 or 150 grit), and then move onto something finer like 180 or 240. Once you have finished sanding, remove as much dust as possible with a dusting brush, and then wipe down again with a damp cloth.
Priming
There’s always a debate – do you prime first, then fill? Or fill first, and then prime? Priming often makes lots of smaller holes/imperfections more obvious, so it makes sense to prime first and then do the filling and caulk gaps where pieces of timber meet. The downside is that, in sanding down your filler, you remove some of the primer, which then needs touching up. In terms of a choice of primer, it depends what you’re dealing with:
- For new, bare wood, a standard acrylic wood primer is fine, such as Johnstone’s Trade Joncryl primer.
- For previously painted wood, any good adhesion primer (such as Johnstone’s Trade Aqua guard Primer) will work well.
- If the fire surround is stained/varnished, then I tend to use a solvent-based stain-blocking primer like Zinsser Cover Stain, which will not only give great adhesion but also help stop any tannins or colour from wood stain leaching through.
Filling
Use a good quality wood filler such as HB42 Ultimate to fill any holes, cracks etc, and caulk gaps between pieces of timber. Once the filler has cured, sand it smooth and “spot prime” with your primer. Once the primer and wood filler have all fully dried/cured, a light sand and dust down will help create a super smooth finish.
Painting
Apply your paint in thin, even coats, allowing each coat to dry thoroughly (see the manufacturer’s instructions) before moving onto the next. A light sand with very fine sandpaper between coats will do no harm.
You will need a minimum of two coats, probably three, to achieve a really good finish, depending on the paint you are using, how dramatically the colour is changing, etc.
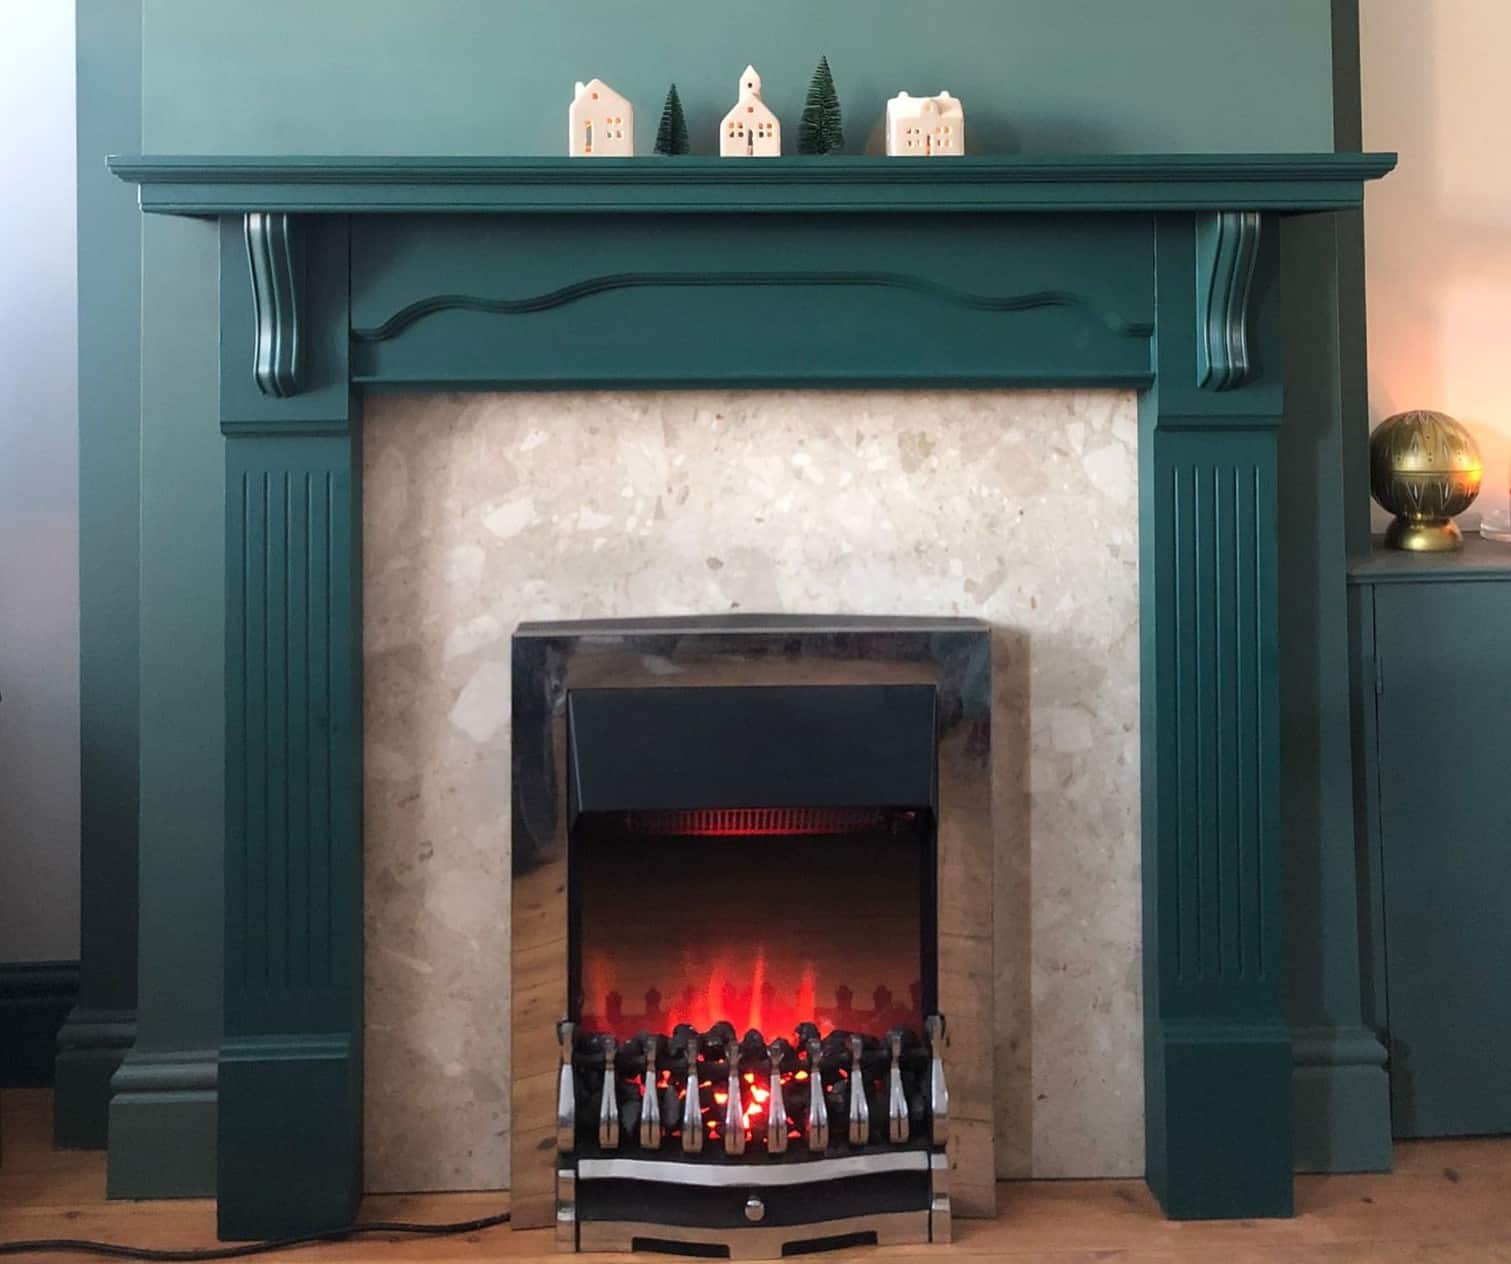
Depending on the design of the fire surround, you may want to spray it with a little HVLP machine if you have one, or you may prefer to do it by brush. If there are flat surfaces (as in the example in the photos), I roll these using Axus Pureflow Extra Short Pile 4” mini-rollers, and then lay off with my brush. The amount of laying off needed is often minimal, but using the mini rollers means I distribute the paint faster and more evenly over the surface.
Varnishing
This step is optional, but if your fire surround is going to be subjected to a lot of wear and tear, you may want to consider giving it a couple of top coats of Polyvine Decorators Varnish (available in gloss, satin and dead flat matt) for extra protection. Click here to see online prices.

Choosing the Right Paint for a Fire Surround
If your wooden fire surround is going to be near the fire, you should give serious thought to using a fire-resistant paint or top-coat varnish. In most cases though, there is sufficient clearance for there to be very little risk – if the fire surround is existing (i.e. not newly installed) and the fire has ever been used, then you will already know if there is any risk of it catching fire.
Ultimately the choice of paint is down to you, and the look you are trying to create – you could use chalk paint and create a “distressed” look, or you could use any good quality trade paint for wood in a colour of your choice.
Give due consideration to how much wear and tear the fire surround is likely to suffer, and choose a hard-wearing paint (or add protection with a clear varnish on top, as mentioned above) if needed. A paint I’ve used a lot of recently for this type of project is Johnstone’s Trade Aqua Guard. It’s super hard-wearing, and is available in matt, satin and gloss. You can achieve a lovely finish with it, and it’s available in a huge choice of Johnstone’s colours. FYI, the fire surround in the photos is painted with Johnstone’s Trade Aqua Guard in matt, and the colour is “Night Watch”. Click here for product details.
FAQs
What kind of paint do you use on a wood fire surround?
Any good-quality trade woodwork paint will do the trick, providing you do a good job of painting your fire surround and use the appropriate primer. The most popular paint for this with Decorators is Johnstone’s Trade Aqua Guard.
Can you paint a laminate fire surround?
Yes, clean the laminate, abrade to create a key, then use a good-quality adhesion primer like Bedec All Prime or Zinsser BIN Aqua.
What is the best paint finish for a fireplace surround?
Satinwood is the most popular finish now.
What is the best colour to paint a fire surround?
You can paint your fire surround white, which matches the woodwork in most peoples’ homes. Or you could use an accent colour and turn your fireplace into a real feature.

Final Thoughts
Although only a small part of the room in terms of surface area, your fire surround is a real focal point, and giving it a little TLC can lift the whole room. It’s one of those smaller jobs which therefore feels very rewarding without taking a huge amount of time and effort.


0 Comments